Welcome to the PPaaS developer platform. This section encompasses details on how to create a simple integration with PPaaS.
High-level view of the API integration solution

Banks and acquirers can leverage API to provision merchants, stores, and devices. They can also handle the subscription to their services and their configuration. Reporting is also a key functionality available via API. Those core functionalities of PPaaS are available in the core service section. Service providers who want to be part of the PPaaS ecosystem can implement the various SPI (Service Provider Interface) and the API. PPaaS manages several business services that can be found in the payment services and commerce services sections. For development on devices, it can be done by leveraging directly API, or PPaaS SDK. For more information, contact sales. PPaaS offers Point of Sales (POS) 's capability to connect and perform operations from POS to a terminal leveraging the Nexo Retailer protocol. This part is described in the endpoint section.
1. Sign up with PPaaS
Get started with PPaaS by creating a free test account on our demo environment. Your test account gives you access to the test area, which allow you to generate credential and interact with PPaaS. Please fill out the following sign-up form. A member of the partner enablement team will assist you in the journey.
2. Connect to PPaaS portal
Once your onboarding has been validated by the partner enablement team, you will receive an email from PPaaS noreply@ppaas.tech ( please make sure to also verify your spam folder). The email contains a link to create your password and set up your OTP (One Time Password). Please complete the above registration steps as soon as possible as the link expires within 24 hours.
Given your persona, you will be able to connect to a dedicated portal:
Merchant Aggregator Portal for an acquirer.
Provider Portal for a service provider.
In the demo environment, perform the following steps to login:
Set your user domain as follows:
userName@userdomain.com. Your user domain is communicated to you by your PPaaS Sales representative.Enter your login and password.
Enter your One Time Password (OTP).
The first created user will have an Administrator role, and will be able to invite colleagues leveraging the user management section. Ensure that the users created have either the role Developer or Administrator, to be able to create applications and declare services.
3. Register your app
Registering your application in PPaaS allows you to use PPaaS APIs. Your registered application gets unique credentials to interact with PPaaS. You can register one or multiple applications.
To register your application, follow the steps:
Access the Application Management section.
Click on +ADD APPLICATION.
Enter the application name and description. The description may help the other users of your organization to quickly identify it.
Click on SAVE to validate the registration of your application.
PPaaS supports those 2 security flows:
Authorization Code: To get an access token in exchange for a temporary code, after a user authorizes an application. Use it for B2C scenarios, where your application requires end-user authentication, e.g. acquirer or merchant credentials.
Client Credentials: To get access on behalf of an application, not a user. Use it for B2B scenarios or for all machine-to-machine communication in general.
Note that for B2C flows you have to set the redirection URL as well as the web origin URL. For more information about the security mechanism check the page Integration with Oauth2 section.
You can regenerate your Client Secret whenever it is required. To regenerate your Client Secret, follow the steps:
Select your application and navigate to the ADVANCED tab.
Click on the RENEW button next to your key.
Copy the new key that is generated and paste it into your application.
Important: Renewing the Client Secret makes the old one obsolete. All access tokens already generated remain valid until their expiration date.
4. Test your app
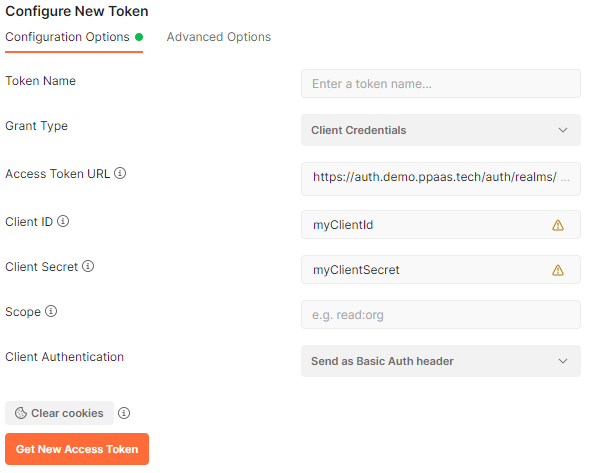
For fast onboarding, generate an application that supports Client Credential flows. Then, use a resource API that allows you to retrieve a list of basics, such as currencies.
Generate an access token
Here is the result:
1
2
3
4
5
6
7
8
{
    "access_token":"Access_Token",
    "expires_in":18000,
    "refresh_expires_in":0,
    "token_type":"Bearer",
    "not-before-policy":1609968533,
    "scope":"email profile"
}
Use the token to call the resource endpoint
1
2
3
curl --location 'curl --location 'https://api.int.ppaas.tech/resources/v1/countries'  \
--header 'Authorization: Bearer Access_Token
--header 'Content-Type: application/json' \
You should receive a HTTP response code 200.
Sample payload
1
2
3
4
5
6
7
8
9
10
11
12
13
14
15
[
    {
        "code": "BG",
        "display": "Bulgaria"
    },
    {
        "code": "MM",
        "display": "Myanmar"
    },
    {
        "code": "BI",
        "display": "Burundi"
    },

]
Now you have completed your first API call on PPaaS.
5. Register your service
As a service provider, you need to declare your service so that, after implementation, it becomes part of the service catalog that the acquirer can propose to their merchant. In the demo environment, the service that you are building will be attached to a generic acquirer and merchant in order to allow you to test your implementation in a self-service model.
6. Advanced testing leveraging webhook & asynchronous callback
In most service provider scenarios, an action on the terminal will trigger a webhook call to the service provider. The service provider must implement this webhook and even provide an asynchronous response.
Process flow
Here is a typical example of these two concepts: Webhook and asynchronous reply.
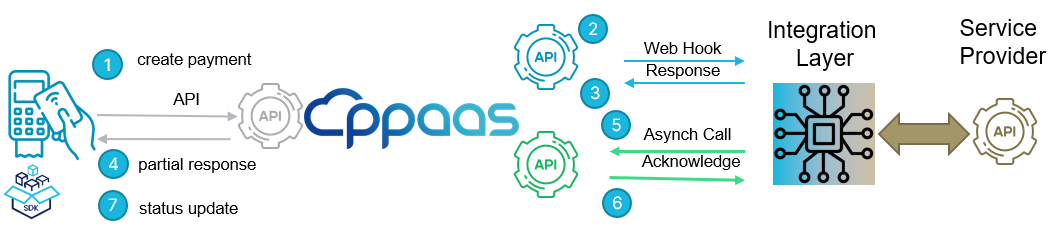
The terminal triggers a call, e.g. it generates a QR code payment.
PPaaS receives the call from the terminal, enriches the content by providing additional data such as merchant ID and acquirer, and then forwards it to the service provider.
The service provider sends a response to PPaaS, e.g. an image.
This image is displayed on the terminal for the consumer to scan and pay.
The service provider sends events to PPaaS to inform them about the payment process flow.
PPaaS acknowledges the events.
PPaaS forwards the events to the terminal.
This is a typical complex action workflow. For more details, refer to the Alternative payment methods with QR code page.
Trigger a call as a terminal
One of the pain points is triggering the first set of transactions, i.e. triggering the action on the terminal. This process is not easy to perform as it requires a physical terminal and cannot be easily automated for testing.
Terminal communication is highly secure as it requires a special OAuth2 token and an mTLS connection.
To facilitate the integration, PPaaS has made possible to generate this custom token but only on the demo environment.
To generate the custom token, follow the steps:
Ask for a merchant token.
Enter the merchant credential (OTP is disabled for the generic account).
Use this merchant token to call the custom token endpoint within the specific terminal information.
Use this token and pass it on the call that requires it.
You can find the details in the respective topics: APM, gift card and digital receipt.
Overall flow leveraging Postman
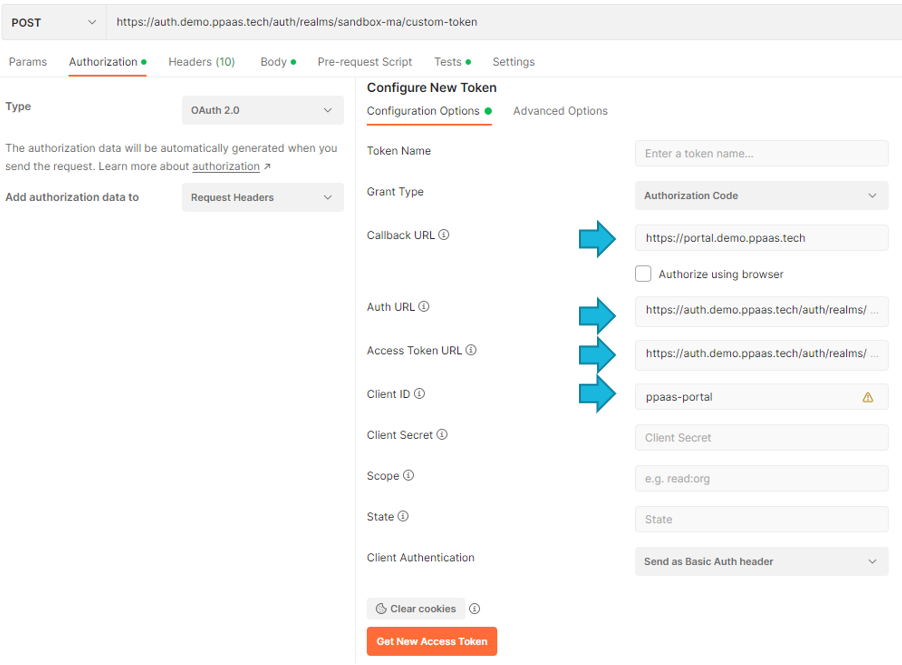
Request a token
tenant used: sandbox-ma
Callback URL: https://portal.demo.ppaas.tech
Auth URL: https://auth.demo.ppaas.tech/auth/realms/sandbox-ma/protocol/openid-connect/auth
Access Token: https://auth.demo.ppaas.tech/auth/realms/sandbox-ma/protocol/openid-connect/token
clientId: ppaas-portal
Using Postman
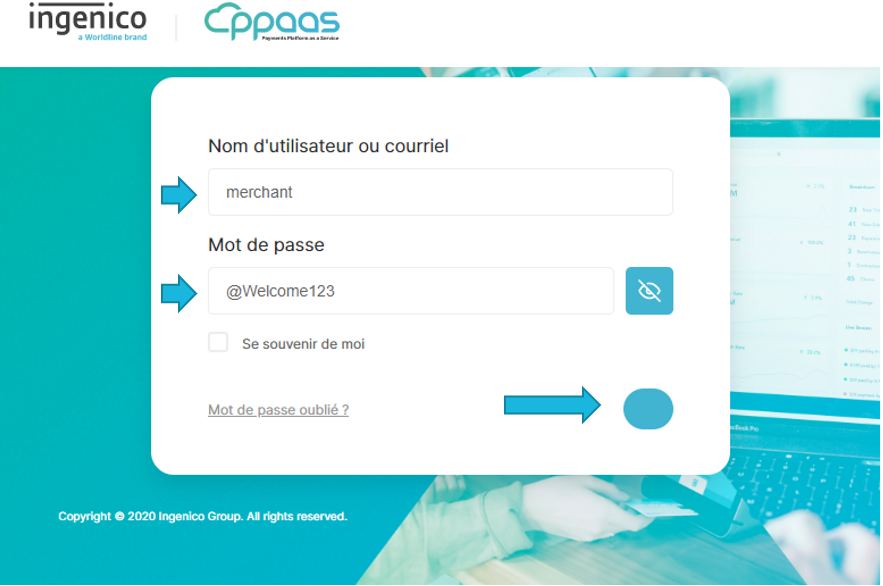
Enter merchant credential
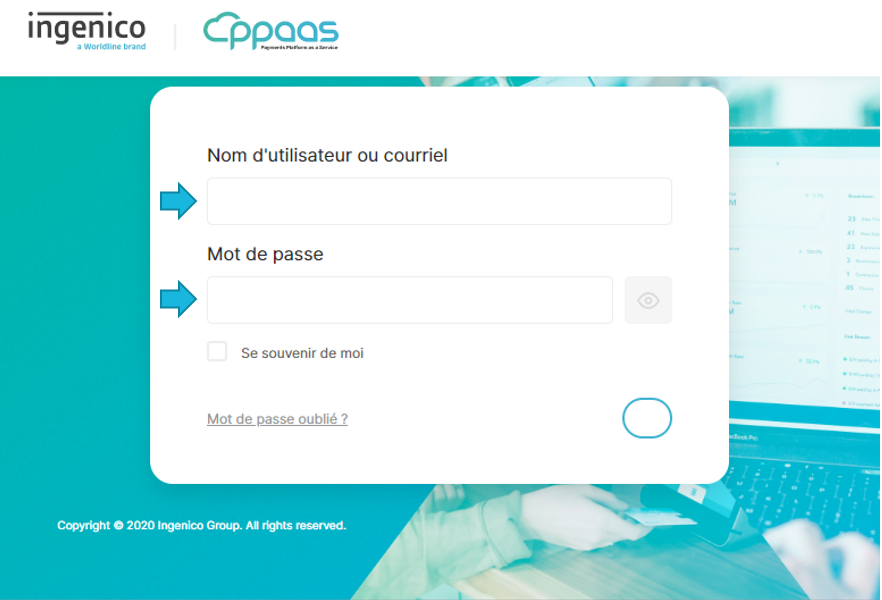
Fill the form with the following credentials: username: merchant
password: @Welcome123
No OTP is required.
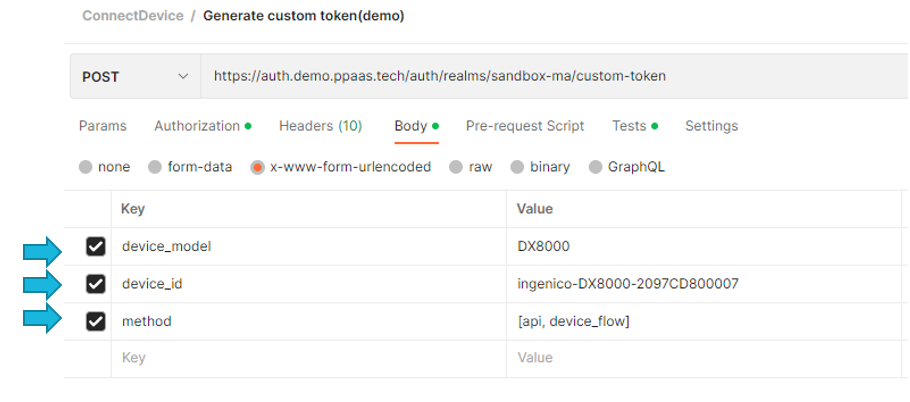
Retrieve custom token
POST https://auth.demo.ppaas.tech/auth/realms/sandbox-ma/custom-tokenyou need to provide the url encoded.
Device model
Device Id
Curl command equivalent
1
2
3
4
5
6
curl --location 'https://auth.demo.ppaas.tech/auth/realms/sandbox-ma/custom-token' \
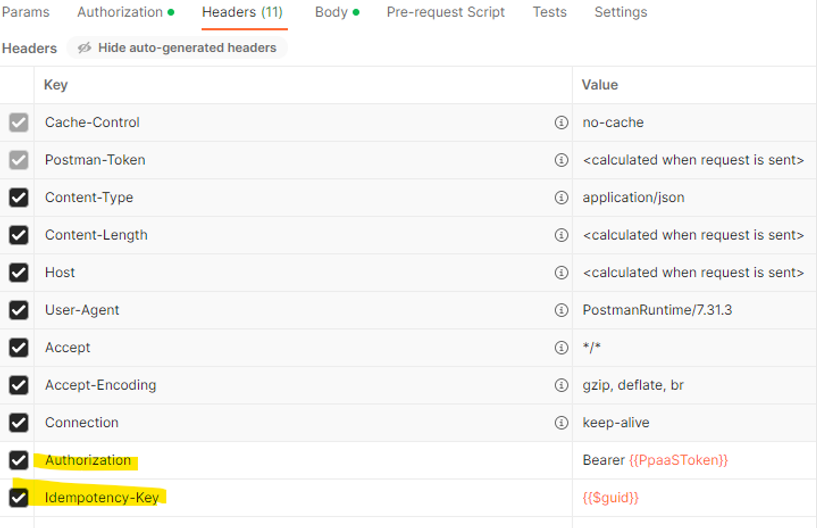
--header 'Authorization: Bearer TokenRetreivedFromPreviousCall' \
--header 'Content-Type: application/x-www-form-urlencoded' \
--data-urlencode 'device_model=DX8000' \
--data-urlencode 'device_id=ingenico-DX8000-2097CD800007' \
--data-urlencode 'method=[api, device_flow]'The results will look like this:
1
2
3
4
5
6
7
8
9
10
11
{
"access_token": "a JWT device token",
"expires_in": 300,
"refresh_expires_in": 900,
"refresh_token": "a JWT to refresh the access token,
"token_type": "Bearer",
"id_token": "a JWT representing the Identity of the merchant",
"not-before-policy": 1609968533,
"session_state": "ff4fd585-1e54-4514-ba9a-b258edf2f384",
"scope": "profile email"
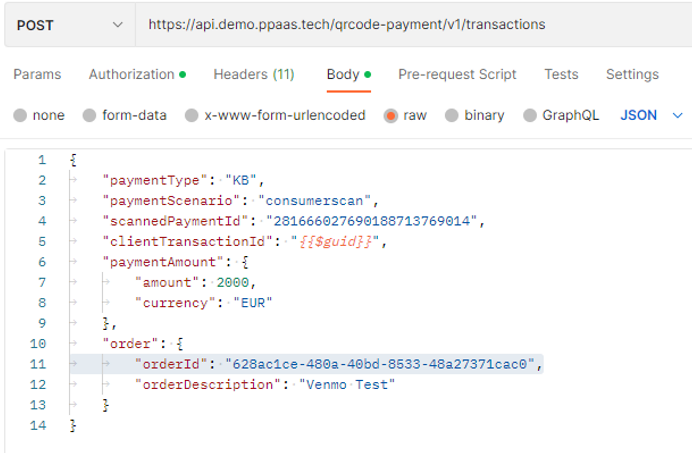
}Trigger a call as a terminal leveraging the custom token
1
2
3
4
5
6
7
8
9
10
11
12
13
14
15
16
17
18
19
curl --location 'https://api.demo.ppaas.tech/qrcode-payment/v1/transactions' \
--header 'Authorization: Bearer JWTCustomTokenRetreivedFromPreviousCall' \
--header 'Content-Type: application/json' \
--data '{
    "paymentType": "KB",
    "paymentScenario": "consumerscan",
    "scannedPaymentId": "281666027690188713769014",
    "clientTransactionId": "9236613c-ef7e-4a98-bfb6-16048c0e4f9b",
    "paymentAmount": {
        "amount": 2000,
        "currency": "EUR"
    },
    "order": {

        "orderId": "628ac1ce-480a-40bd-8533-48a27371cac0",

        "orderDescription": "Venmo Test"
    }
}
Environment and portal
Environment | Main API URL | Security | Client portal | Service provider portal |
Demo (worldwide) | api.demo.ppaas.tech | auth.demo.ppaas.tech | client-portal.demo.ppaas.tech | spportal.demo.ppaas.tech |
North America (UAT/Production) | api.nar.ppaas.com | auth.nar.ppaas.com | {client_name}.client-portal.nar.ppaas.com | spportal.nar.ppaas.com |
India (UAT/production) | api.ind.ppaas.com | api.ind.ppaas.com | {client_name}.client-portal.ind.ppaas.com | spportal.ind.ppaas.com |
Europe (UAT/ production) | api.eur.ppaas.com | api.eur.ppaas.com | {client_name}.client-portal.eur.ppaas.com | spportal.eur.ppaas.com |
Notes:
In a production environment, the client portal URL contains the client's name.
In a demo environment, the client portal and the service provider portal require a two-step login:
First to determine the user domain (userName@yourUserDomain.com)
Set your username and password to complete the login
Production environment and mTLS
The terminal must connect to PPaaS using an mTLS connection to precisely identify the terminal and avoid spoofing. The MTLS flows are essentially used for the devices connecting to the PPaaS API gateway directly on port 9021.
The device must submit a valid client certificate that is recognized by the PPaaS platform. All Ingenico devices contain such a certificate that can be leveraged using a dedicated SDK.
You can obtain the authentication token in one or two steps:
First method for machine-to-machine model
Second method involves end-user identification
Machine-to-machine mode
This section provides the process to get a device token
MTLS calls to identify the terminal
As the terminal certificate contains its serial number, PPaaS will be able to identify the store.
Notice that the serial number must be provided as a query parameter for the tetra device.
1
2
3
curl --key conf/client.key --cert conf/client.pem --cacert conf/bundle.pem  -X GET \
--header 'Content-Type: application/json' \
  https://auth.demo.ppaas.tech/oauth2-mtls/v1/merchants-credentials?serial_number=220597303201181723869389
Retrieve clientId & secret
The result of the call provides you with a response, where you can retrieve the clientId and clientSecret.
1
2
3
4
5
6
7
8
[
  {
  "merchantName": "firstname lastname",
  "userDomain": "ppaasfr",
  "clientId": "XXX",
  "clientSecret": "YYY"
  }
]
Apply client credential code flow call to get a device token
1
2
3
4
5
6
curl --key conf/client.key --cert conf/client.pem --cacert conf/bundle.pem  -X POST \
--header 'Content-Type: application/x-www-form-urlencoded' \
--data-urlencode "client_id=${client_id}" \
--data-urlencode "client_secret=${client_secret}" \
--data-urlencode 'grant_type=client_credentials' \
  https://auth.device.demo.ppaas.tech:9021/oauth2-mtls/v1/token
Retrieve access token
1
2
3
4
5
6
7
8
{
    "access_token":"JWT access Token",
    "token_type":"Bearer",
    "expires_in":300,
    "refresh_expires_in":0,
    "id_token":"JWT ID token",
    "scope":"openid email profile"
}
Use it on all subsequent calls as a bearer token
End user identification
Connect to
https://auth.device.demo.ppaas.tech:9021/oauth2-mtls/v1/tokenProvide a username and password leveraging the password grant type
Use the application
ppaas-powered-app
1
2
3
4
5
6
7
8
curl  --key conf/client.key --cert conf/client.pem --cacert
conf/bundle.pem  --tlsv1.2 --tls-max 1.3 -X POST \
--header 'Content-Type: application/x-www-form-urlencoded' \
--data-urlencode "username=${username}" \
--data-urlencode "password=${password}" \
--data-urlencode 'grant_type=password' \
--data-urlencode 'client_id=ppaas-powered-app' \
--data-urlencode 'scope=openid profile email'
Retrieve the access token
The result of the call will look like this example.
1
2
3
4
5
6
7
8
9
10
11
{
    "access_token": "a JWT device token",
    "expires_in": 300,
    "refresh_expires_in": 900,
    "refresh_token": "a JWT to refresh the access token",
    "token_type": "Bearer",
    "id_token": "a JWT representing the Identity of the the merchant",
    "not-before-policy": 1609968533,
    "session_state": "ff4fd585-1e54-4514-ba9a-b258edf2f384",
    "scope": "profile email"
}
Use the access token in subsequent calls as a bearer token
For more information about OAuth2, refer to the integration with OAuth2 section.